Connect Your Snowflake Account
This allows you to establish a secure connection between your Snowflake account and the Anavsan platform. This integration enables Anavsan to access your Snowflake account metadata to provide AI-powered optimization insights and cost analysis.
How it works?
The connection process uses a dedicated Snowflake user with read-only permissions to securely access your account metadata. Here's what happens:
- You create a dedicated Snowflake user - A service user specifically for Anavsan with limited, read-only permissions
- You provide connection credentials - Account identifier, username, and authentication details through Anavsan's secure form
- Anavsan validates the connection - Tests credentials and verifies the user has required permissions (IMPORTED PRIVILEGES and MONITOR USAGE)
- Metadata is synced - Anavsan begins collecting snowflake account meta
The connection is read-only and secure - Anavsan cannot modify your data, execute queries on your behalf (except metadata queries in the dedicated warehouse), or access sensitive business data. Only metadata and performance metrics are collected.
This page guides you through a two-step process to establish this connection and access monitoring tools.
Snowflake Setup Guide
Use these SQL commands to set up your Snowflake environment before connecting.
1. Create a Snowflake User
Create a dedicated user for Anavsan to establish a secure connection.
Requirements:
- ACCOUNTADMIN role or equivalent privileges
- Strong, unique password
SQL Command:
CREATE USER anavsan_user
PASSWORD = '<StrongPassword>'
MUST_CHANGE_PASSWORD = FALSE;
Best Practice: Use a dedicated user account rather than sharing existing credentials to maintain security and audit trails.
2. Create or Choose a Role
Assign a role with necessary permissions for monitoring and analysis.
Required Permissions:
IMPORTED PRIVILEGESon SNOWFLAKE databaseMONITOR USAGEon account
SQL Commands:
CREATE ROLE anavsan_role;
GRANT ROLE anavsan_role TO USER anavsan_user;
GRANT IMPORTED PRIVILEGES ON DATABASE SNOWFLAKE TO ROLE anavsan_role;
GRANT MONITOR USAGE ON ACCOUNT TO ROLE anavsan_role;
Note: You can use an existing role if it already has the required permissions.
3. Create a Warehouse
Create a warehouse for Anavsan to execute queries.
Recommended Configuration:
- Size: XSMALL
- Auto-suspend: 300 seconds
- Auto-resume: Enabled
SQL Commands:
CREATE WAREHOUSE anavsan_wh
WAREHOUSE_SIZE = XSMALL
AUTO_SUSPEND = 300
AUTO_RESUME = TRUE
INITIALLY_SUSPENDED = TRUE;

ALTER USER anavsan_user SET DEFAULT_WAREHOUSE = anavsan_wh;
GRANT USAGE ON WAREHOUSE anavsan_wh TO ROLE anavsan_role;
The XSMALL warehouse size keeps operational costs minimal while providing adequate performance for monitoring activities.
4. [Optional] Update Network Policies
If your Snowflake account has configured a network policy to restrict access based on IP address, you'll need to update the network policy to allow Anavsan to connect.
In Snowsight, go to Admin » Security » Network Policies. From there, add the following IP addresses to your Allowed IP Addresses list:
'3.130.165.248'
You can also apply the changes via SQL instead. The example below shows how to create the policy and assign it to the Anavsan user. Be sure to update the policy and user names as needed:
1 CREATE OR REPLACE NETWORK POLICY anavsan_network_policy
2  ALLOWED_IP_LIST = (
3   '3.130.165.248'
4  );
5
6 ALTER USER anavsan_user SET NETWORK_POLICY = anavsan_network_policy;
Updating an account wide network policy: If you're updating a network policy that is already active for all users in your Snowflake account, you do not need to reassign the policy to the Anavsan user. Simply adding the new IP is enough.
Connect Your Snowflake Account
Provide basic account details to identify your Snowflake connection.
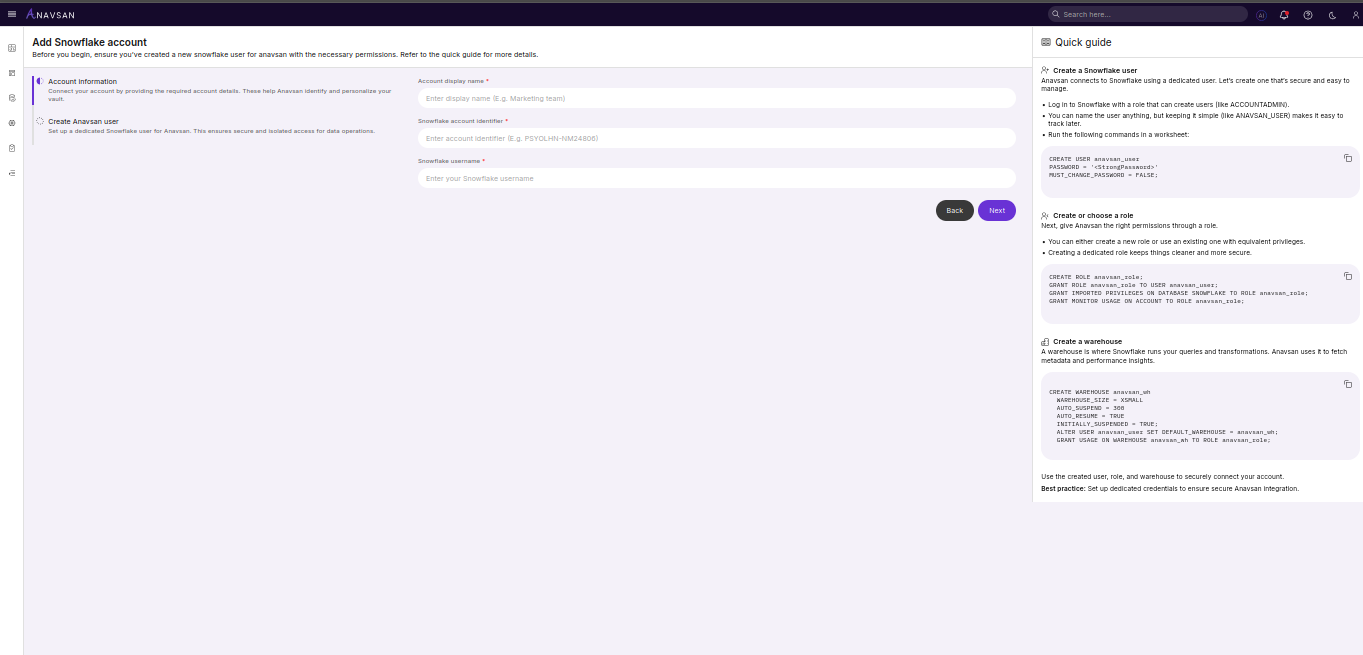
Form Fields
| Field | Description | Use Case |
|---|---|---|
| Account Display Name | Friendly name to identify your Snowflake account | Differentiate between multiple connected accounts |
| Snowflake Account Identifier | Your unique Snowflake account identifier from your account URL | Establish connection to your Snowflake account |
| Snowflake Username | Your Snowflake username | Display queries executed by your user |
Navigation Buttons
- Back - Returns to the overview page
- Next - Validates the form and proceeds to Step 2
Configure Username, Role and Warehouse
Configure authentication and connection details for the Anavsan user.
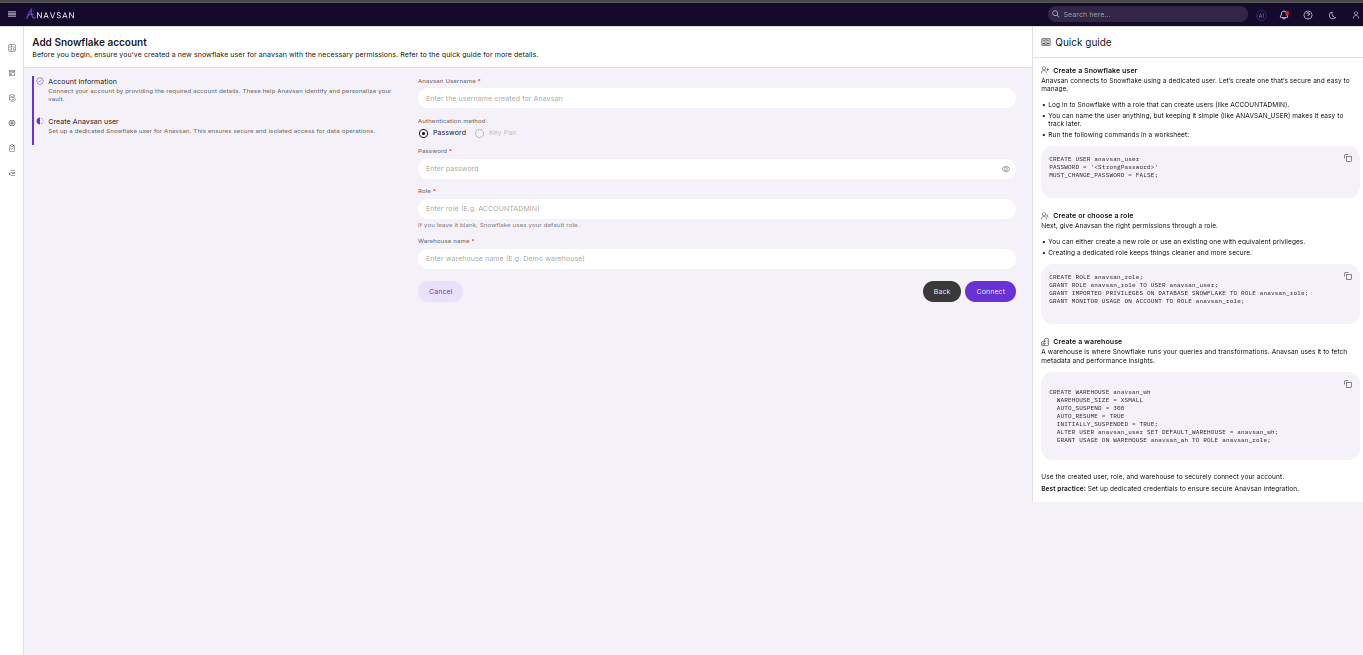
Form Fields
| Field | Description | Use Case |
|---|---|---|
| Anavsan Username | Username of the dedicated user created for Anavsan | Authenticate Anavsan's connection to Snowflake |
| Authentication Method | Password-based or key-pair authentication | Select your preferred security method |
| Password | Password for the Anavsan Snowflake user | Authenticate using password-based method |
| Role | Snowflake role with required permissions | Control Anavsan's access to data and metadata |
| Warehouse Name | Warehouse for Anavsan operations | Execute queries for metadata and analysis |
Navigation Buttons
- Cancel - Returns to the overview page
- Back - Returns to Step 1
- Connect - Validates credentials and establishes the connection
Validation:
Anavsan validates credentials and permissions when you click Connect. Error messages appear if validation fails.
Next Steps
After connecting, your account appears in the Accounts List. Click the account name to access the Account Details page and monitoring tools.